My entry in Beccy's Place Fifth Annual Month of Holiday Cards Challenge for the letter "V is an "Vellum Ornament." I used one of Beccy's beautiful freebies named "Christmas Bauble 1." Printed the ornament on vellum and colored it from the back with Tombow markers. To make the holly stand out, I cut an insert from a scrap of white cardstock that I adhered behind the holly. (This was easy to do since Beccy had drawn in the lines for the insert in her design!) Highlighted the top and bottom of the ornament with a white gel pen, fussy cut it out and set it aside. Stamped the pine branches in dark green ink with a stamp from an SU set, "Ornamental Pine" on a 4 x 5¼ inch rectangle of white cardstock. Added a few touches of brown "bark" on the branches, and shaded a few of the pine needles with a dark green Tombow marker to add depth. Punched a hole in the top of the vellum ornament, looped a 6-8 inch strand of silver thread through it and typed a loose knot on the end. Positioned the ornament on the front of the card and taped it down (put the tape on the white cardstock- not the vellum- and it won't show.) Then wrapped the silver thread around to the backside of the rectangle and taped it down. Adhered this rectangle to black cardstock and trimmed it closely. Adhered this to an A2 card front. The sentiment, also printed on vellum, is a Lili of the Valley digi set named "Christmas Wishes."
Entered into:
Beccy’s Place Challenge- November (beccysplace.blogspot.com)
Crafty Hazelnut’s Christmas Challenge- Anything Goes (craftyhazelnutschristmaschallenge.blogspot.co.uk)
Crafty Hazelnut’s Christmas Challenge2- Extra for Nov (craftyhazelnutschristmaschallenge2.blogspot.com)
The current Whimsie Doodles challenge is named "Santa's Helpers." I posted an earlier card I entered in this challenge that highlighted a cute Elf. This time, I decided to show a more realistic helper, namely a "mom" holding a carafe of coffee. I mean, who doesn't need a few cups of coffee when staying up late to wrap gifts, or possibly make some of those gifts? (I love this Whimsie Doodles image especially those cute bunny slippers!)
Entered into:
Simon Says Wednesday Challenge- Food and/or Drink (simonsaysstampblog.com/wednesdaychallenge)
Whimsiedoodles Challenge- Anything Goes: Santa's Helpers (whimsiedoodles.blogspot.com)
Artistic Inspirations Challenge-Challenge 190 (artisticinspirationschallenges.blogspot.com.au)
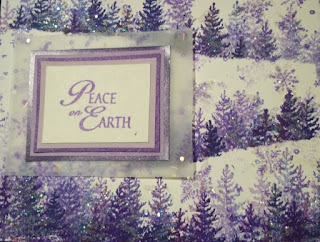
I used to co-own a rubber stamp store in South Dakota. Was blessed to have a business partner that had an accounting background (who took care of all the taxes, etc.) and I made most of our sample cards and taught classes. I was thinking about that recently and remembered the classes that were most popular involved making cards that didn't take a lot of time to make, didn't require expensive stamps, tools or accessories and had a "wow factor." My "Snowy Scene" card was a favorite! Decided to make one again and develop a tutorial to inspire others to try to make one of these really simple cards.
Below are three versions of the Snowy Scene card (the tutorial follows them.)
The original-stamped in purple ink with a layered sentiment and snowflakes , a CAS version- a one layer card stamped in green ink, and a Santa Claus version- the most complicated with the addition of a masked moon in a sky sponged with several shades of blue ink, white gel pen "moonlight reflections" on trees, and a silhouette of Santa and his reindeer. If you look closely, you can even see Rudolphs red nose. So fun!
(PS I am entering this card into the AAA Challenge, "Celebrate" because the first few snowfalls of the year always seems like something to celebrate. This is especially true when we get a beautiful snowfall on Christmas Eve. I'm like a little kid when we have "snow days" with no school/work. Love them!
And, am entering it into the Simon Says Monday challenge, because the mask used to make the snowdrifts are made with torn paper. )
And, am entering it into the Simon Says Monday challenge, because the mask used to make the snowdrifts are made with torn paper. )
Entered into:
Simon Says Monday Challenge- Tear It Up (simonsaysstampblog.com/mondaychallenge)
The Paper Shelter- #319 A Christmas Card (thepapershelter.blogspot.com.ar)
Double D’s Challenge- Here Comes Santa Claus (daranddiane.blogspot.com)
AAA Card Challenges- Celebrate (aaacards.blogspot.com/)
Here is the tutorial:
Materials needed-
o Scrap paper (postcard size- ¼ of an 8.5 x 11 inch sheet of any lightweight paper will work)
o Card stock (cut and folded into an a2 size card)
o Ink pad (I used the purple and blue sections of a rainbow pad for this sample. Use color/s of your choice.)
o Tree stamp (I used a small stamp from Embossing Arts, but any size should work.)
o Other stamps- selected sentiment, assorted snowflakes.
o Other items- Glitter and Zig 2-Way glue pen (or sparkly Stickles.), scrap cardstock, adhesive, vellum.
Preparations-
o Cover table/countertop with scrap paper as you will be stamping off of the edges of the card.
o Lay folded cardstock out on stamping surface (Note- the card can be stamped horizontally or vertically. My sample card was created to be horizontal, i.e. folded along the top of the card.)
Stamping directions-
Step 1) Create snowdrift mask by tearing top 1/3 of a postcard-sized piece of scrap paper off at a slight angle. (To simplify directions, I’ll refer to the larger scrap as Mask A, and the smaller piece as Mask B.)
Step 2) Lay mask A across the top of the card. Ink the tree stamp and tap it across the top of the card. To get layering effect, stamp image several times at varying heights before re-inking. (The lower edges of the image should be on the mask, not the card front.) Remove mask A.
Step 3) Flip mask B over, and lay it across the center of the card. Repeat stamping tree image as in step 1, making sure to leave an open space for sentiment to be stamped/layered. Remove mask B.
Step 4) Stamp layer of tree images across the bottom of the card.
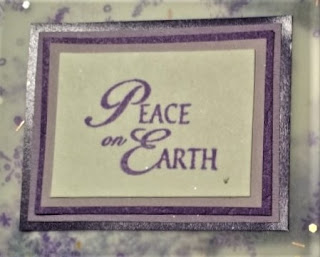
Step 5) Stamp sentiment on cardstock scrap and layer as desired. (I used several layers of colored and glittery cardstock plus vellum with metallic flecks.) Set aside.
Step 6) Stamp snowflakes, repeating the image several times before re-inking to create depth. Add glitter with sparkly stickles. Or draw squiggles with glue pen across the tree images and snowflakes and sprinkle with glitter. (Here is a close up of the glittery snow!)
Step 7) Attach sentiment.


Beautiful array of Holiday cards! Great designs and perfect colors! Love the Santa Sleigh one, the background is really beautiful....magical! Thanks so much for playing along with us at the Double D Challenge, Here Comes Santa Claus, Donna, DT Member.
ReplyDeleteWow. These are all terrific. Thank you for the tutorial as well.
ReplyDeleteGorgeous vellum ornament. Thank you for sharing with us at AAA Cards. Tracie =)
ReplyDeleteI love the bauble card Kathy, you're very good at working with vellum. I really like the way you colour the image from the back to make the details pop. The pine needles look wonderful in the background and give the impression of a decorated Christmas tree.
ReplyDeleteYour "Christmas Helper" card is right on the money! I've had plenty of those kinds of nights as I'm sure most Mums have. Love the big pink heart in the background.
Thank you so much for the fabulous tutorial Kathy, the cards you made are beautiful! Like your customers, I too enjoy simple cards that have a "Wow!" factor, and yours definitely fit the bill. I'll be having a go at your tutorial for sure.
Cheers,
Beccy
WOW! Beautiful backgrounds and gorgeous cards! Thanks so much for joining in the fun at our Double D ‘Here Comes Santa Claus’ challenge! We hope you’ll come back often.
ReplyDeleteDarlene
DOUBLE D Challenge Blog
DAR’S CRAFTY CREATIONS Please stop in for a visit!
What a lovely collection of cards! They really show versatility and each one made me smile. I love the detailed-look of the pine needles and the silver touches are lovely. The bunny slippers on the second card are adorable and I love the magical feel of the snowy tree-covered hills. Thank you for taking the time to share such beautiful pieces with us for this week's Simon Says Stamp Monday Challenge!
ReplyDeleteBeautifully created cards...thank you for joining our Santa challenge at Double D!
ReplyDeleteDiane DD DT {Nellies Nest}
Beautifully done and thanks for the photo tutorial about how you achieved the diagonal trees. Thanks for playing at AAA Cards.
ReplyDeleteFabulous collection of cards. Thanks for playing along at AAA Cards
ReplyDeleteElaine
Lovely cards Thank you for joining us at Artistic Inspirations, Louise DT x
ReplyDeleteGreat cards. Thanks for joining us at The Paper Shelter this week.
ReplyDeleteBeautiful cards! Such lovely designs! Very pretty!!
ReplyDeleteThank you very much for joining us this week at the Simon Says Stamp Wednesday Challenge Blog!
hugs...
Melissa
Stunning. Lovely design and gorgeous colours used for our "HERE COMES SANTA CLAUS" challenge, sure suits our theme beautifully ...hope to see you next challenge.. Double D Challenges{DT aNNie}
ReplyDelete