This sweet digi has been a summer favorite since I added it to my digital
collection in 2019. The cutie looks adorable against the row of cabanas on an upcycled calendar page. And, the sentiment
is a perfect fit since I remember when my hair was long, that lip gloss could be so frustrating on a windy day!) I like
adding details to my cards, including drawing strands of hair with a fine-point
marker. This sentiment encouraged me to add a few strands blowing across her
face and lips.
Supplies:
·
Background Scene- Upcycled from an old calendar
·
Digi- Cute As A Button (Beach Babe) Sadly, the company closed in 2022 due
to family health issues. I miss Francesca!
·
Colored with Spectrum
Noir Classique markers and Sakura Gelly Roll white gel pen
· Front Sentiment “Wind+Lipgloss+Longhair=Stress”- friday freebie quotes by
Kellie Winnell (Blog now closed)
·
Inside Sentiment- “Don’t Hurry… Be Happy”
from an Imagine That digi set (Sadly, the company is no longer in business. I miss Kris!)
·
Sookwang double-sided tape- Available from several sources on the web.
·
Tropical flower sticker, other misc. items and tools from my stash.
Entered into:
Time Out Challenge- Challenge #292 (My favorite place to travel is to the nearest ocean!)
Outlawz Sunday Challenge: Songs and Rhymes-Summer
Classic Design Challenge: Anything Goes #07-2025
Jul/Aug (optional-
Sand/Sun/Water)
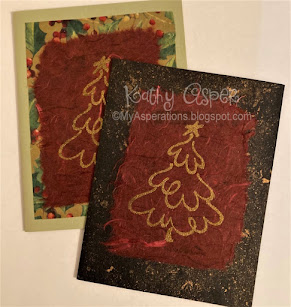
Although I haven’t heat embossed a
card for a while, I wanted to make a card
for the current Emboss It theme at Simon Says Wednesday Challenge. I had also found
so many treasured items while decluttering, including decades-old burgundy mulberry paper, plus one of the first wood-mount
rubber stamps I bought back at a Stampin’ Up party in the ‘90s. After stamping and embossing two of the trees onto the mulberry paper. I used a wet paintbrush to draw a rectangle around each tree, waited a few minutes for it to soften the paper's fibers, then carefully tore along
the rectangle’s edges. When dry, I adhered the mulberry paper atop two different background
papers. (One paper is a scrap of gift wrap with pretty gold accents. The other
was created using a spray paint Marbling technique found on the web. I made both gold and silver versions and attached a pic.) I’m sure
what sentiment(s) I’ll use, so will decide later.

Supplies:
·
Stampin Up wood mount rubber stamp- Retired long ago
·
Embossed with gold pigment ink and Glitter Gold Embossing Powder- both
from my stash
·
Black and gold paper made with Spray
Paint Marbling- two tutorials HERE and HERE
·
All other misc. items and tools from my stash.
Entered into:
Since retiring, I’ve been slowly
decluttering my craft room. In the process, I found several brass stencils and
a metal stylus. I remember when using these “tools” to create impressions via “dry
embossing” was all the rage! But the process always seemed very tedious to
me, so I was glad to find a small pile
of dry embossed images that I could easily use on cards today! The trio of hearts
impression didn’t have much depth, but I liked how the edges of the brass
stencil, when dry embossed, provided a nice “frame” for the hearts. I added a sentiment
below the hearts and used four pink eyelets to decorate the corners of the
finished embossing! (The eyelets, plus an eyelet setter tool, were also found
when decluttering. I didn’t remember how to “set” eyelets, so I did a bit of web
research on how to use a hammer for this purpose. After practicing a bit on scraps
of paper, I was able to set the eyelets and finish a delicate Valentine’s Day Card. I'll be adding it to a gift
packet of cards for an upcoming wedding gift.
Supplies:
·
Lasting Impressions Brass Stencil, Embossing Stylus, Eyelets,
and eyelet setter tool from my stash
· Front
Sentiment “Happy Valentine’s Day”- from a Hero Arts Digital set (retired)
· Inside Sentiment-
Computer Generated and embellished with Hershey’s Kisses and "fngerprints" made with a brown ink pad
·
Sookwang double-sided tape- Available from several sources on the web.
·
Pink ribbon, patterned paper, silver cardstock, other misc. items
and tools from my stash.
Entered into:
(Via Pinterest) Simon Says Wednesday Challenge- Emboss
It


Kathy, I love the girl at the beach. I can see why she's a fave. And the card that you made with the Stampin' Up! Christmas tree is so sweet too. I remember that set! It was at a Stampin' Up! party in the 90's that I too got involved in all this paper crafting too! It's great to see you using your old stuff. I love mine. Thanks so much for playing along with us at Word Art Wednesday. We appreciate you!
ReplyDeleteThank you so much for joining us at the Inspiration Station Challenge! Your card is such a perfect interpretation of the inspiration image this month! And I love that sentiment, it couldn't be more true!
ReplyDeleteGreat cards Kathy, but esp your first - I'll take that sort of stress anyday LOL! Love how you have taken me to the ocean and on a trip down memory lane! Thanks for joining our Travel challenge at Time Out Challenges - hope to see you again soon!
ReplyDeleteHugs, Kate (DT Time Out)!
Another inspiring trio Kathy - that lass at the sea side is stunning - and I had to smile at the sentiment... like you, have been there, done that.
ReplyDeleteThe Christmas tree cards are gorgeous
Love your valentines card - I also have some of those brass stencils lurking - I do know where they are, but don't know if I ever thought to emboss through them
Blessings
Maxine
Lovely creations!! Thanks so much for participating in our SUNDAY SONGS AND RHYMES challenge!!! I appreciate that you play along and I enjoy visiting your blog!! Have a happy crafty day!! Deanne at A Little Bit O’ Paper
ReplyDeleteSuch a unique holiday card. Thanks for sharing at Festive Fridays.
ReplyDeleteGreat cards! The lip gloss made me giggle! Thanks for sharing with Outlawz Songs and Rhymes Challenge!
ReplyDeleteWOW! Great creations! I love the ideas and creativity! Thank you for joining us at Classic Design Challenge! We look forward to seeing more of your future creations! ~ Amanda
ReplyDelete