Friday, May 31, 2019

Misc Themed Cards

I have been unable to post to my blog most of the day because our internet was down. Ackk. I didn't realize how often I access the web after starting a blog. I made a card to enter into Conie Fong's monthly challenge this afternoon, and as soon as our internet was back up I posted it. I made a box card [using a tutorial from  HERE] that features one of Coni's super cute penguins named "Snowy." [You can find it HERE.] I colored Snowy with Spectrum Noir markers and white gel pen. Then fussy-cut the  little cutie  to turn her into a popup for the  box card., however, I made sure that Conie's signature is intact near Snowy's little purple boot. The sparkly snowflake stickers are on scraps of acetate so that they look like they are floating. Here is a closeup from a different angle that shows the acetate a bit. The sentiment is computer generated. I am entering this card into several other challenges including Outlawz Saturday "Around the World" [Penguins are from another part of the world from where I live in the Midwest] , Outlawz Tuesday Color Challenge [my card doesn't include flowers, but its primary color is purple [I added a few more colors and a twist of sparkle]  and Bugaboo Color Challenge [my primary color is purple, but I also used shades of grey and a bit of rusty yellow on his beak.]
 
Entered into: 
Bugaboo StampsColor Challenge      
Outlawz Challenges- Tuesday Color Challenge  [Twist= Your Choice]                                                                    
Word Art Wednesday Challenge- #388-#389 Anything Goes                    
Outlawz Challenge- Festive Fridays                                                                    
Outlawz Challenge- Saturday Paper Ala Mode- Around the World         
Conie Fong Art & Design Group [FB]- Monthly Challenge- May               
  
Another card that I got entered in the nick of time for the Outlawz Progressive Challenge features this fun Dr. Digi image named "Valentine Derek."   You can find him HERE. I had a few origami hearts that I'd made for a challenge earlier this year and used it to embellish the card. [You can find a helpful tutorial HERE. I'd used a 3x3 inch square of red foil paper so that it fits easily on a card front, and the red foil paper is super easy to fold.] The sentiment is computer generated and the foil wrappers decorating the inside of the card were upcycled from chocolate eaten during the making of this card. Yummy.  Am entering this card into several challenges including the Sisterhood of Crafters Wedding or Anniversary theme [I'm thinking that this could be a Valentine card... or an Anniversary card?]
 
Entered into: 
Simon Says Wednesday Challenge- Anything Goes                                       

The Sisterhood of Crafters- Wedding or Anniversary                

Polkadoodles Challenge Week 22-Anything Goes                                          

My final card for this post features assorted garden flowers and wildflowers that I picked and dried when we lived in South Dakota. They are at least 5 years old, so I'm impressed that they've retained some of their colors. The reason for this might be that after drying them in an old phone book [remember those?] I sealed them in clear laminate. I developed my own process for doing this that you might find helpful if you ever dry flowers. First, cut ovals with dies or scrapbook stencils from acetate. [I prefer old overhead transparencies that I used back before we had PowerPoint presentations. You can purchase them at most office supply stores.] Arrange small bunches of dried flowers onto these ovals, then carefully lay a strip of clear laminate sheet [available from office supply stores] on the flowers and press to seal. If you don't have or can't find clear laminate, clear packing tape does work, but it is harder to use because it is thinner than the clear laminate so is harder to lay atop the dried flowers. It also appears to create static electricity that tends to mess up the dried flowers when you are trying to lay the tape over the flowers.  The scripture verse is computer generated and printed onto vellum.  I decorated the card with delicate patterned paper, [I cut an oval into one of these papers to create a frame for the dried flowers], an ornate die-cut and little butterflies that I fussy-cut from scrapbook paper.  
Entered into: 
Outlawz Challenges- Songs and Rhymes- The Butterfly
The Paper Shelter- #385 Flower Power
Crafty Hazelnut’s Patterned Paper Challenge- May                                        

Last Day of May

For this weeks QKR Stampede Challenge, my DT card features two fun QKR images [Q-digi13913 Boy in Window Digital Stamp and  Q-digi13913 Boy with Balloons Digital Stamp. You can find them HERE. ] Although a little tedious, the card actually was pretty easy to make. I made the card base by cutting a 4.5 x 11 strip of cardstock and folded it into a tri-fold card. I printed off the images, then used an Exacto knife to cut out the bottom part of the window on the Boy in Window image. I then colored the rest of the image with Spectrum Noir markers and white gel pen. After adhering a bit of patterned paper [or should I say "wall paper] onto the front of the card, I laid the colored image onto the front of an A2 card and traced the cutout section. Using the Exacto knife, I then cut through the patterned paper and front of the card. I then adhered the colored image onto the front of the card. I colored the other image and adhered it on the first flap of the card, making sure to position it so that the tennis shoes showed through correctly. [Then, after noticing that the window cutout was not perfectly aligned on the back of the card front, I cut a piece of the patterned paper used on the card front to frame the opening. You can see this in the second photo.] All of the sentiments are computer generated. I did some googling to find a Mickie Mouse saying for the front and settled on "Hot Diggety Dog!" Discovered that I could create the "talk bubble" for the sentiments in my Word program [select "Insert" then "Shapes" then "Callouts". ] Drop the shape you select into your document on top of the word/s that you want inside of the talk bubble. [Note- the bubble will cover the word, don't worry. We'll make it transparent next.] Click on the talk bubble to highlight it. Select "format" then "Shape fill" then "no fill". To change the color of the talk bubble outline, select "format" then "shape fill" then "shape outline" and click on the desired colors. Lastly, to change the size or shape of the talk bubble, just grab the outline and pull it to the correct size.  You can also adjust the talk bubble "tail" by clicking on its point and pulling it in any direction until you get the look that you desire. If you mess up, just click on the outline and click "delete." [I messed up on the "It's Your Birthday" talk bubble when cutting it out. That is why it is layered. After taking the photo I decided that I need to print and cut out a single layer version before I use the card.] The final sentiment is on the inside of the card. [I thought that the "happy, happy, happy" saying sounded like something that Mickie would say. My hubby said it sounds more like something from Duck Dynasty guys. So… I think that this card will be sent to my brother-in-law that is a fan of that show. So funny.] Am entering this card into a few challenges including Simon Says Monday Frame It Challenge [the window frame fits the requirement], and Outlawz Saturday Paper Ala Mode Around the World Challenge [I think that Mickie Mouse is recognized by people around the world, right?]


Entered into: 
Simon Says Wednesday Challenge- Anything Goes                                       
Outlawz Challenge- Saturday Paper Ala Mode- Around the World         

 This month I joined the Scrappers Delights FB Progressive Challenge and received an image named "Just for you Mum." I especially like it because the girl is holding a rose in her hands… and my sweet Mom's name was Rose. She was an amazing person, and although she moved on to her mansion in heaven 9 years ago, I think of her so often and miss her so very much. She was my stamping buddy the last few years of her life until Alzheimer's stole away her ability to color and cut… and her memories of how important crafting was to her. So… I dedicate this card to my mom. She would have loved coloring the image. And, the beautiful young girl does resemble mom as a young girl as she had dark thick hair and a gorgeous smile.  [PS You can find the image HERE and it is on sale right now.] The  inside sentiment is from a Whimsy digi set named "Vintage Sentiments." You can find it HERE [for just $3.]  
Entered into: 
Scrappers Delights Progressive Monthly Challenge- FB
Outlawz Challenge- Festive Fridays       

My last entry in this post is also being dedicated to my sweet mom and features another rose image. This one is from an old Denami wood mounted image, embossed on vellum with fine-line black powder, and colored from the underside with Tombow markers. Fine pink and green glitter adhered to the front of the vellum with Tombow Dual Tip Permanent Multi Liquid Adhesive. The sentiment, an old Printworks wood mount, was stamped in dark green onto a scrap of paper. The paper was then torn to size and layered atop several scraps of cardstock and patterned papers onto the top of an A2 card. I attached the vellum to the A2 card front by looping a strip of sheer ribbon through two holes. [You can find instructions for this technique HERE. I made my card with a few differences. I used a horizontal orientation and instead of attaching the vellum to a postcard I attached it to an A2 card.]

Entered into: 
The Paper Shelter- #385 Flower Power
Word Art Wednesday Challenge- #388-#389 Anything Goes                    


Wednesday, May 29, 2019

Flowers Galore

It's Wednesday! So time for another challenge at Penny's Paper Crafty Challenge Blog where challenges are always Anything Goes and prizes are awarded from one or more sponsors.  Stop by the blog to check it out! The sponsor this week is Bugaboo and I used their wonderful image named "Floral Butterfly Thank You."
Printed the image off on Kraft brown cardstock and colored it with Spectrum Noir markers and Sakura Gelly Roll white gel pen. Printed off an extra butterfly, fussy-cut it and attached it to the inside sentiment which is from a Whimsy digi set named "Vintage Sentiments." You can find it HERE [for just $3.]  
 
 
Entered into: 
Bugaboo StampsColor Challenge      
Outlawz Challenges- Songs and Rhymes- The Butterfly
Outlawz Challenge- Festive Fridays                                                                    
Crafty Hazelnut’s Patterned Paper Challenge- May                                        

My second card for this posting also is a floral card that features an image named "Faythe's Cherry Flowers" from Tiddly Inks. [You can find it HERE. You can also nab a free colored version HERE.] I tried a new technique with this card- 3-D Paper Piecing. You can find directions HERE. I also found a simplified version HERE. I printed the image on Kraft brown cardstock, then printed copies of her bouquet and dress, colored them, fussy-cut them, then set them aside.
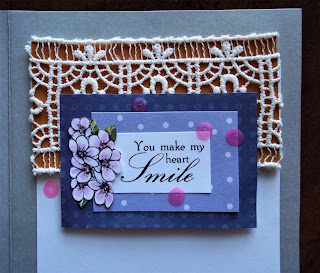
Fayth is colored with Spectrum Noir markers and white gel pen. [The colors are a little iridescent because I photographed the card near a window, so I guess that sunlight can distort the color a bit?] When all the separate pieces were colored, I burnished them, then layered all onto a card base that includes a strip of lovely lace and a few layers of dotted background paper. This allows me to enter the card into the current Tiddly Ink challenge, "Let's Get Dotty." I added a handful of pretty pink sequin "dots" to make sure that it was truly Dotty. So fun. I also added a few sequins, and one spray of flowers to the inside sentiment, which is from a Whimsy digi set named "Vintage Sentiments." You can find it HERE [for just $3.]  Am entering this into several challenges, including Outlawz Tuesday Color Challenge [used the required purple and added orange and Kraft brown. The twist is lace.]
 
Entered into:  
Tiddly Inks- Challenge-#225- Let's Get Dotty 
Simon Says Monday Challenge- Frame It
Outlawz Challenges- Tuesday Color Challenge  [Twist= Your Choice]     

My final card for this challenge is a wedding card that features several items from my scrapbook stash. The grey frame includes an oval cut out that highlights a sweet little wedding couple stamp which is a long retired image from either Hero Arts or Printworks. [I can't remember which and removed the image from the wood mount years ago.] I fussy-cut the sparkly flowers from a sheet of scrapbook paper. The grey and white striped paper was upcycled from the inside of a box that held my husband's new leather wallet. The matching inside includes fussy-cut flowers, a scrap of ribbon and a vellum sentiment from my scrapbook stash. Am entering this into several challenges, including Outlawz Saturday Challenge [Love occurs all around the world.]
Entered into: 
Double D’s Challenge- Frames                
The Sisterhood of Crafters- Wedding or Anniversary                
Outlawz Challenge- Saturday Paper Ala Mode- Around the World          


Monday, May 27, 2019

Holiday Weekend [3]

This weeks challenge at wecraftcards Forum is to make a card using the "Rubber Band Technique" that can be found HERE. I was a ittle creative with this technique, using rubber bands wrapped around a clear block to craft a grassy outdoor scene with an explosion of color. [The explosion of color is the pheasant because when my hubby used to go hunting, he said that the pheasants explode out of the fields with little warning.] I decorated the card with a few pheasant feathers, an old postage stamp, and a digi sentiment from a Beccy's Place set named "True Beauty." You can find it HERE. [I use this little sentiment quite often. I like the font style and it easily fits on the front of a card.] I used a decorative edge postcard from my stash as a stencil, sponging ink along the edge to frame the card. I like the way it pulls your eye into the scene. The inside sentiment is from a wood-mount stamp I've had for many years from Great Impressions. Am entering this into a few challenges including Outlawz Saturday Challenge "Around the World" [my hubby and I used to live in a part of central South Dakota that was referred to as the "Pheasant Capital of the World." I'm not sure if that was true, but I do know that we feasted on sweet and sour pheasant several times during each year's hunting season.]  
The bird prints on the inside of the card were made using a red rubber stamp from Victorine Originals.[It is currently available for just one dollar from HERE.] 
 
 
Entered into:  
We Craft Cards Monday Challenge- Rubber Band Technique                    
Simon Says Monday Challenge- Use Stencils
Outlawz Challenge- Festive Fridays
Outlawz Challenge- Twisted Thursday- [TWIST –Masculine]
Outlawz Challenge- Saturday Paper Ala Mode- Around the World         

I wanted to make another square card for the Cute Card Thursday Challenge. I stamped the Great Impressions sentiment that I'd used on the pheasant card onto a scrap of tan parchment paper. I created a background with a square of sage green cardstock and a scrap of a square doily [I was going to toss this out after I cut the frilly corners off for a different card… and was now happy that I'd saved it!]  The sparkly flowers were fussy-cut from scrapbook paper. I arranged them to frame the scripture on the front of the card and finished it with gold photo corners.
Am entering this into a few challenges including Outlawz Tuesday Color Challenge [my card includes the required purple, plus sage green, Kraft brown and the twist is glitter.]
 
Entered into:  
Cute Card Thursday#583 Square
Outlawz Challenges- Tuesday Color Challenge  
Word Art Wednesday Challenge- #388-#389 Anything Goes                    
A2zscrapbooking Monthly Challenge- May Flowers                     
Crafty Hazelnut’s Patterned Paper Challenge- May                                        

I love this ethereal Ching-Chou Kuik image named "Dandelion Fairy Kingdom." [You can find it HERE.] I wanted the lacey dandelions to show up, so I printed the image onto kraft brown cardstock and colored the beautiful fairy and background with Aquarelle watercolor pencils. Was planning use a wet brush to turn the pencil coloring into watercolor, but when finished I decided that I liked the slightly rough and wispy look of the coloring with just the pencils. Added white highlights on the dandelions, flowers, the fairy's delicate features, and her necklace. Found a scrap of lace in my stash that fit the feeling of the card, added a rose-colored strip of ribbon and a little bow to add a final feminine touch to the card. Ahhhh… isn't she beautiful? The sentiment on the front of the card is from a Beccy's Place set named "Keeping It Simple." [You can find it HERE.] The inside sentiments are from two sentiment sets from We Are 3 Digital Sentiments- Special Wishes and Birthday Wishes. [You can find them HERE.]
 
Entered into: 
Ching-Chou Kuik's FB Challenge- Lace                                                              
The Paper Shelter- #384 Birthday Girl
Polkadoodles Challenge Week 21-Anything Goes


Holiday Weekend [2]

Since I had my Printworks Dots and Stripes Stencil out, I decided to make another card for Simon Say's Monday Challenge-"Use Stencils." I made a stamped tri-fold card, using instructions found on Pinterest. You can find them HERE [however, I only used the first two minutes of the video to learn how to cut and fold the card. After that, I gold embossed images on the card. The process is a little tedious when making this card because I needed to line the holly leaves up on both sides of the card. [When I have some time I'll make a tutorial with all the steps. Until then, I posted several photos of the finished card so that you'll have an idea of the steps involved. ]The Holly Stamp and sentiment stamps are all from Printworks Stamps and are colored with Tombow watercolor markers [which don't bleed through the paper as much as my Spectrum Noir alcohol marker.]
 
Entered into:  
Crafty Hazelnut’s Christmas Challenge- #439 Anything Goes                     
Word Art Wednesday Challenge- #388-#389 Anything Goes                    

This bright butterfly is surprisingly easy to make. It's from a book named "Easy Butterfly Origami" that is available for purchase HERE. I'd signed up for a weekly newsletter a while ago from  Dover Publications and have appreciated that is offers links to a half dozen coloring books and activity books, each offering 4-5 pages that are available for a short time as free downloads. This Blue Morpho butterfly was one of those pages available late last month.  Here is the LINK. [If it is not available to you as a download, sign up for the sampler newsletter to start getting your own treasures.]
I decided to make a penny slider card to allow the butterfly a little freedom. [They sound difficult but really are quite simple. I found THIS TUTORIAL to be very helpful.] I'm entering this card into several challenges including Outlawz Saturday Challenge "Around the World" [most Blue Morphos are found in South and Central America rainforests.]
 
 
Entered into:  
Outlawz Challenges- Songs and Rhymes- The Butterfly
Simon Says Wednesday Challenge- Bright Colors Moodboard                  
Outlawz Challenge- Saturday Paper Ala Mode- Around the World         

Since becoming a DT at Penny's Paper Crafty Challenge Blog. I've been introduced to Cute As A Button Digis and love the personalities of the characters. This month I discovered that they have a FB progressive challenge and that this sweet image [named Ice Cream and Pickles] was available to new members at no charge. Of course I signed up! [You can join the FB group to get the digi, or it's available for sale HERE. ] Had fun creating a baby shower card. The wonderful ice cream paper in the background is from a paper assortment from Imagine That  Digistamps. You can find it HERE. The sentiments are all computer generated. The little dill pickles were drawn and colored by moi. [However, they don't look nearly as yummy as the ice cream products!] I used a simple eclipse technique [you can find instructions at Beccy's Place] to highlight the ice cream/pickle Sunday and her cute baby bump. Discovered that I was out of pink vellum, so sponged baby pink ink onto regular vellum and it worked beautifully. [Don't know why I didn't think of this sooner. It was so very easy to do.]
 
Entered into: 
Bugaboo Stamp- Stella Says Sketch Challenge #710                                     
Crafty Hazelnut’s Patterned Paper Challenge- May                                        
Cute As A Button-#44 Anything Goes [girls, girls, girls]          
Cute As A Button Facebook Group- Progressive Challenge